Getting started with GitHub Actions and Laravel
When GitHub released its new product: GitHub Actions a whole new world opened for developers. Let's dive right in and see what it brings for the Laravel community.

At Spatie, we have been using Circle CI, Travis CI, Chipper CI, and other services for quite a while, but we couldn't find an exact fit for our cases. We were excited when GitHub announced its CI/CD service named GitHub Actions this year and think this might be the CI/CD service for all our projects.
With GitHub Actions, you can spin up a container in no time, use actions from other authors to run in your container, commit to your repositories, and that all without leaving GitHub. And even better, the free tier GitHub provides you is very generous. With a free account, you can spin up to 20 containers concurrently and run 2000 minutes of containers for free.
Using GitHub actions starts with workflows you define in your repository, which consist of jobs that will be run concurrently, and in these jobs, you can define a sequence of steps that should be executed. A workflow will be triggered by an event like a push, pull request, or even a cron you can define.
You can write workflows in YAML, which makes them easy to write and read. In the beta version of GitHub Actions you had to use Ocaml, which was quite hard to comprehend, and there was almost no documentation. If you were a bit frightened by the beta version, like me, then rest assured: the YAML version is easier to use, and the documentation is well written.
Creating a test workflow
Let's say we want to run our test suite each time someone commits to our repository. First, we create a tests.yml workflow file in .github/workflows:
name: Tests (PHP)

on: [push]

jobs:
    tests:
        name: Run tests
        runs-on: ubuntu-latest
        steps:
            -   uses: actions/checkout@v1
This is the most basic workflow we can have. First, we define by the on key that this workflow will run when a commit was pushed. Then a job named Run tests is created which will run on the latest version of Ubuntu, it is possible to use other machines like Windows or macOS.
The last thing we do is defining the steps this job consists of. In this example, this is just one step: we checkout the code of the commit that was pushed. A step can be an action that was defined by you or someone else, and that will run some code. You can also immediately run code in the shell of the container.
In this case, the step is an action created by GitHub itself, we import it with the uses keyword. Actions can be imported from folders within your project or from GitHub, just like the checkout action.
Let's add some steps and go through them step-by-step! A small note, within the examples below I've changed the indentation a bit for readability, don't forget to indent it back correctly when creating your workflow!
Running composer
-   name: Run composer install
    run: composer install -n --prefer-dist
    env:
        APP_ENV: testing
Downloading and installing dependencies via composer will be the first thing we do. The uses keyword is now changed to run so we can execute commands directly in the container. There's also an env key, here you can pass in variables like in your Laravel .env file, neat!
Preparing Laravel
-   name: Prepare Laravel Application
    run: |
        cp .env.example .env
        php artisan key:generate
Next we create our Laravel application by making an .env file from the .env.example and by setting an application key. The pipe on the first line of the run keyword makes it possible to execute multiple lines of commands.
Running Yarn
-   name: Cache yarn dependencies
    uses: actions/cache@v1
    with:
        path: node_modules
        key: yarn-${{ hashFiles('yarn.lock') }}

-   name: Run yarn
    run: yarn && yarn dev
Two steps? We are running yarn in the second step, a simple action by now that will create a node_modules directory with the dependencies of the project. The first step will cache the node_modules directory. This is specified by path within the with key of our step. We will cache the node_modules directory as long as the hash of the yarn.lock file stays the same, we can specify this with key.
The with key of an action allows you to configure how actions run, you can read about these parameters in the readme's of actions. The ${{ }} syntax allows you to run code within your YAML file. You can read more about it here.
We can also cache the composer dependencies installing, instead of caching the node_modules directory we cache the vendor directory. We can write this action as such:
-   name: Cache composer dependencies
    uses: actions/cache@v1
    with:
        path: vendor
        key: composer-${{ hashFiles('composer.lock') }}

-   name: Run composer install
    run: composer install -n --prefer-dist
    env:
        APP_ENV: testing
Testing our application
We've prepared our container for running tests, and now the time has come to do that, let's have a look at the step:
-   name: Run tests
    run: ./vendor/bin/phpunit
    env:
        APP_ENV: testing
Nothing fancy here: we run PHPUnit from the vendor dir and set the environment to testing. Our test suite will use the env variables set by the phpunit.xml file:
        <env name="APP_ENV" value="testing"/>
        <env name="CACHE_DRIVER" value="array"/>
        <env name="SESSION_DRIVER" value="file"/>
        <env name="QUEUE_CONNECTION" value="sync"/>
        <env name="DB_CONNECTION" value="sqlite"/>
        <env name="DB_NAME" value=":memory:"/>
        <env name="DEBUGBAR_ENABLED" value="false"/>
But you're free to change these variables in your action, for example, you could change the type of database connection to MySQL as such:
-   name: Run tests
    run: ./vendor/bin/phpunit
    env:
        APP_ENV: testing
        DB_CONNECTION: mysql
        DB_NAME: our-awesome-tested-app
        DB_PASSWORD:
        DB_USER: root
The last thing we do is storing any logs created by our Laravel application when the tests crash, this can be achieved by using the upload artifacts action:
-   name: Upload artifacts
    uses: actions/upload-artifact@master
    if: failure()
    with:
        name: Logs
        path: ./storage/logs
As you can see, we've added a new keyword to our step: if. This will make this action only run if a certain condition is true. In this case, this action will only run if the previous action failed due to the failure() expression, there are a lot of other expressions that you can use, for example, the always() expression will always run your step even if the previous steps failed.
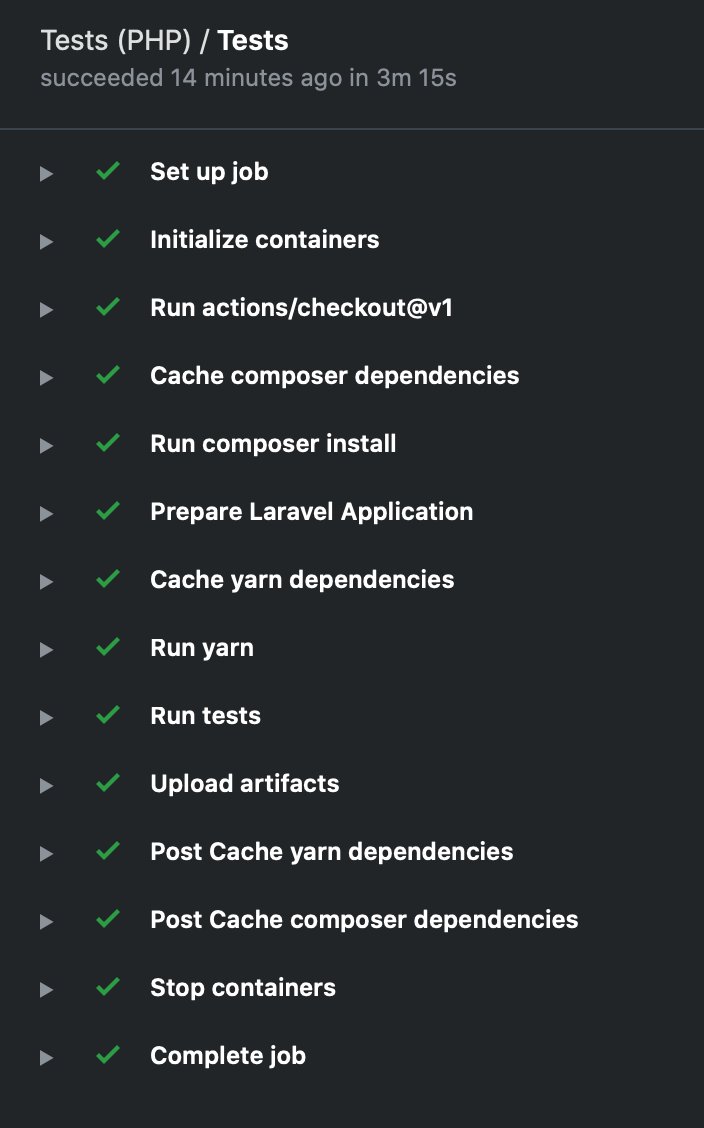
Running the workflow
Now it's time for the big moment! Commit and push this workflow and head over to your repository in GitHub, in the `Actions` tab, you will see a container getting started, and it will go through all our steps!
Creating a mysql database in the job
In the example above, we used an SQLite database for testing, this is extremely fast but has some disadvantages like no support for JSON columns. You can also use a MySQL database, but it requires a bit more setup.
We're going to pull in a MySQL docker image, this will start a MySQL server in our container. We can do this by adding a services key to the tests entry like so:
// ...

jobs:
    tests:
        // ...

        services:
            mysql:
                image: mysql:5.7
                env:
                    MYSQL_ALLOW_EMPTY_PASSWORD: yes
                    MYSQL_DATABASE: our-awesome-tested-app
                ports:
                    - 3306
                options: --health-cmd="mysqladmin ping" --health-interval=10s --health-timeout=5s --health-retries=3

        // ...
Within the services section of the workflow, we can define services that will run in the background during the execution of the workflow. You could, for example, also add a Redis server here.
We add a new MySQL service to the services section. For this service we will be using the mysql:5.7 image from docker. This is an official MySQL docker image that can be configured. We configure the creation of a new database called our-awesome-tested-app and allow the root password to be empty in the env section, the port for the MySQL database will be 3306 by setting it in the ports key.
The last section in our MySQL service is the options key. Here we can define some specific options to the docker service. In this case, we will wait until the MySQL server responds so we know for sure it is running.
Conclusion
GitHub Actions are a welcome addition to every developer's toolbelt, I will be using it for all of my next projects. Within the next few weeks I will try to publish some more posts about creating your own actions, using a matrix to test multiple PHP versions and a workflow to lint and fix your PHP/Js code. See you then!
Want the whole workflow file in one piece? You can find it here.